

There are days when turning on the oven feels like too much, and those are exactly the days when a no-bake cheesecake earns its place. This Oreo cheesecake is one of those desserts that looks like you spent hours on it, tastes like you bought it from a good bakery, and actually took about twenty minutes of work plus a night in the fridge. The fridge does the hard part. You just have to wait, which is, admittedly, the hardest part of all.
I made this cheesecake for the first time for a birthday when the oven was already full of roast dinner and there was no room, and no patience, for a baked dessert. I crushed cookies for the crust, whipped cream cheese with cream until it was thick and smooth, folded in chopped cookies, and put the whole thing in the fridge with a note on top saying not to touch it. By the next day, it had set into something firm enough to slice cleanly, creamy enough to melt on the tongue, and studded with dark cookie pieces that made every bite a little different. It was gone before the birthday candles were even lit, and I have made it for birthdays, barbecues, and ordinary Tuesdays ever since.
The secret to a good no-bake cheesecake is not complicated, but it is specific. You need full-fat cream cheese, properly softened, and cream whipped to soft peaks, not stiff ones. You need to fold, not beat, once the cookies go in, or you will lose the air that makes the filling light. And you need to give it enough time to set. Four hours is the minimum, but overnight is better, and the difference between a cheesecake that slices cleanly and one that slumps on the plate is almost always just a few more hours in the fridge.
This version uses a chocolate cookie crust made from crushed Oreo-style cookies, a creamy filling full of cookie pieces, and a simple topping of whipped cream and extra crushed cookies. It serves ten to twelve people, which makes it ideal for a gathering, and it is the kind of dessert that children and adults both love without any negotiation. If you have ever wanted a dessert that feels like a celebration without any stress, this is it.
Why You Will Love This Recipe
First, there is no baking, which means no worrying about cracks, water baths, or whether the centre is set. Baked cheesecakes are wonderful, but they are also temperamental, and a cracked top can ruin your confidence even when the taste is fine. A no-bake cheesecake has none of that anxiety. You mix, you chill, and you slice. If you can whip cream, you can make this.
Second, it is a make-ahead dream. In fact, it has to be made ahead, which means dessert is done long before your guests arrive, and you can spend your time on the main course or, more importantly, on actually enjoying yourself. Make it the night before, keep it in the fridge, and take it out half an hour before serving so it is cool but not ice-cold, which is when the flavour is at its best.
Third, the flavour is familiar in the best way. Almost everyone knows what an Oreo tastes like, and the combination of dark chocolate cookie and sweet cream filling is one of those pairings that needs no explanation. The cheesecake filling is not too sweet, because the cream cheese adds a gentle tang that balances the cookies, and the crushed cookies in the filling give it texture so it never feels one-note or too smooth.
Finally, it looks impressive with very little effort. A tall slice with a dark crust, a pale creamy filling speckled with cookie pieces, and a swirl of cream on top looks like something from a cafe. Add a whole cookie on top of each slice, or a drizzle of chocolate sauce, and people will assume you spent far longer on it than you did. You do not need to correct them.
Ingredients You Will Need
For the crust, you will need 28 chocolate sandwich cookies, about 300 grams, finely crushed, and 5 tablespoons of unsalted butter, melted. Do not remove the cream filling from the cookies before crushing them. The filling helps the crust hold together and adds sweetness. A food processor makes quick work of crushing, but a sealed plastic bag and a rolling pin work just as well, and are more satisfying if you need to work off a little frustration.
For the filling, you will need 24 ounces, or 680 grams, of full-fat cream cheese, at room temperature, 1 cup of powdered sugar, sifted, 1 teaspoon of pure vanilla extract, a pinch of fine salt, 1 1/2 cups of heavy whipping cream, cold, and 18 chocolate sandwich cookies, roughly chopped into pieces. Full-fat cream cheese is essential. Low-fat cream cheese has more water and less fat, and it will not set as firmly, leaving you with a soft, wobbly cheesecake that is hard to slice. Room temperature cream cheese is equally important, because cold cream cheese will stay lumpy no matter how long you beat it.
For the topping, you will need 1 cup of heavy whipping cream, 2 tablespoons of powdered sugar, 1 teaspoon of vanilla extract, and 6 to 8 extra cookies, crushed or halved, for decorating. You can also use chocolate sauce or ganache for drizzling, if you like, but it is not necessary. The cheesecake is rich enough on its own, and a simple cream topping lets the cookie flavour shine.
You will also need a 9-inch springform pan, lined on the bottom with parchment paper. A springform pan is worth using here because it lets you remove the cheesecake cleanly without trying to lift it out of a regular cake tin. If you do not have one, you can line a regular cake tin with cling film, leaving plenty overhanging, and lift the cheesecake out by the film once it is set, though the sides will not be quite as neat.
How to Make No-Bake Oreo Cheesecake With Chocolate Cookie Crust
Start with the crust. Put the 28 cookies for the crust into a food processor and pulse until they are fine crumbs, or seal them in a plastic bag and crush them with a rolling pin until no large pieces remain. Tip the crumbs into a bowl, pour over the melted butter, and stir until the mixture looks like wet sand and holds together when you squeeze a handful. Tip it into the prepared springform pan and press it firmly and evenly across the bottom, and slightly up the sides if you like a taller crust. Use the bottom of a glass or a measuring cup to press it down evenly, paying attention to the edges, where a loose crust is most likely to crumble when you slice. Put the crust in the fridge while you make the filling, so the butter firms up and the crust holds its shape.
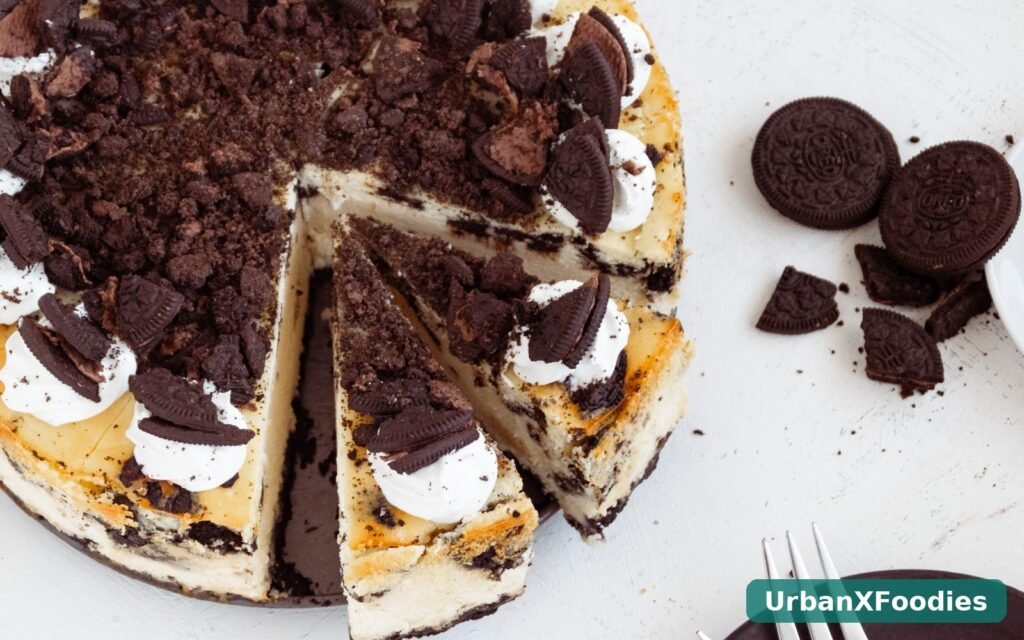
Now make the filling. In a large bowl, beat the softened cream cheese with an electric mixer on medium speed until it is completely smooth and creamy, about 2 minutes. Scrape down the sides of the bowl and the beaters, because lumps love to hide there. Add the powdered sugar, vanilla, and salt, and beat again until smooth and well combined, about another minute. The mixture should be thick, smooth, and sweet, but not grainy. If it tastes too sweet at this stage, do not worry. The whipped cream you are about to add will lighten it considerably.
In a separate, cold bowl, whip the 1 1/2 cups of heavy cream until soft peaks form. That means the cream holds its shape when you lift the whisk, but the peak flops over gently at the tip. Do not whip it to stiff peaks, or the filling will be too firm and a little grainy. Gently fold the whipped cream into the cream cheese mixture in two or three batches, using a large spatula and a light hand, cutting down through the middle and folding over the top, until no white streaks remain. This folding step is what keeps the filling light and mousse-like, so take your time with it and do not stir vigorously.
Now fold in the roughly chopped cookies. You want a mix of sizes, from fine crumbs to pieces about the size of a pea, because that variety is what makes each bite interesting. Do not crush them too finely, or the filling will turn grey and muddy-looking. A few larger pieces are good. Spoon the filling over the chilled crust and smooth the top with a spatula or the back of a spoon. Tap the pan gently on the counter a couple of times to settle the filling and remove any large air bubbles.
Cover the pan with cling film, without letting the film touch the surface if you can help it, and refrigerate for at least 6 hours, or preferably overnight. This long chill is what sets the cheesecake firmly enough to slice cleanly. If you try to slice it after only a couple of hours, it will be soft and will slump, and while it will still taste good, it will not look like the cheesecake you had in mind. Patience is the only ingredient you cannot substitute here.
When you are ready to serve, whip the topping cream with the powdered sugar and vanilla until soft peaks form, and spread or pipe it over the cheesecake. Decorate with crushed cookies, halved cookies, or whole cookies standing upright around the edge, and drizzle with chocolate sauce if you like. To slice, run a long, sharp knife under hot water, wipe it dry, and cut with a firm, straight motion, wiping the knife clean between slices. This gives you neat, clean edges and a slice that looks as good as it tastes. Release the springform pan carefully, transfer the cheesecake to a serving plate if you like, or serve it straight from the base.
Tips
The most important tip is about cream cheese temperature. Take it out of the fridge at least an hour before you start, and cut it into cubes so it warms up faster. Cold cream cheese will not beat smooth, and you will end up with a lumpy filling that no amount of beating will fix. If you forgot to take it out in time, you can warm it briefly in the microwave in 10-second bursts, stirring between each one, but be careful not to melt it, or the filling will be too soft to set.
The second tip is about whipping cream. Keep the cream, the bowl, and the whisk as cold as possible. Cream whips faster and holds its shape better when it is cold, and a warm bowl can make the difference between soft peaks and a sad, runny puddle. If your kitchen is warm, chill the bowl in the freezer for 10 minutes before you start. It is a small step that makes a real difference.
The third tip is about the crust. Press it firmly, especially around the edges, and chill it before you add the filling. A well-pressed, well-chilled crust will slice cleanly and stay in place under the filling. A loosely pressed crust will crumble and mix into the filling when you cut it, which is not a disaster, but it does not look as neat. Take an extra minute with the glass to press it down properly.
Finally, do not rush the chilling time. I know it is tempting to slice into it after a few hours, especially when it looks ready, but a no-bake cheesecake that has chilled overnight is a different dessert from one that has chilled for three hours. The first is firm, clean, and creamy. The second is soft, wobbly, and hard to serve. If you are short on time, make it in individual glasses instead, where a softer set does not matter as much.
Variations to Try
The easiest variation is to change the cookie. Use mint chocolate cookies for a mint cheesecake, peanut butter cookies for a peanut butter version, or golden vanilla sandwich cookies for a lighter, vanilla cheesecake that is less rich. The method stays exactly the same, and the flavour changes completely, which means you can make this recipe many times without it ever feeling repetitive.
For a chocolate ganache topping, heat 1/2 cup of heavy cream until it is just simmering, pour it over 4 ounces of chopped dark chocolate, let it sit for 2 minutes, then stir until smooth. Let it cool until it is thick but still pourable, then pour it over the chilled cheesecake and spread it gently to the edges. Chill for another 30 minutes before serving. The ganache adds a rich, glossy layer that makes the cheesecake feel even more special, and it pairs beautifully with the cookie filling.
For a strawberry version, fold a cup of chopped fresh strawberries into the filling along with the cookies, and top the cheesecake with sliced strawberries and crushed cookies. The strawberries add freshness and colour, and they cut through the richness of the cream cheese. This version is best eaten within a day, because the strawberries release juice as they sit, but it is lovely for a summer gathering.
For individual cheesecakes, divide the crust mixture among 12 muffin cups lined with paper cases, press it down firmly, and top with the filling. Chill for at least 4 hours, then top with cream and a mini cookie. Individual cheesecakes set faster, they are easy to serve at a party, and they look charming on a dessert table. They also solve the problem of slicing, because everyone gets their own perfect portion.
You can also make a lighter version by replacing half of the cream cheese with whipped Greek yoghurt, though the result will be tangier and softer, and it will need a full overnight chill to set properly. It will not taste exactly like the classic version, but it is a good option if you want something a little less rich, and the cookie flavour still comes through clearly.
Serving Ideas
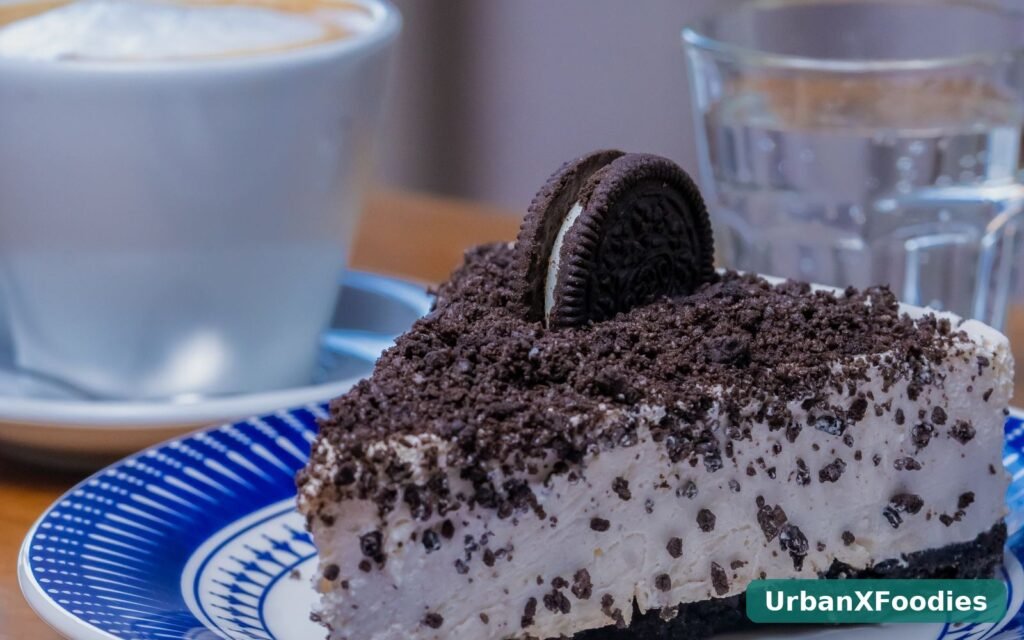
No-bake Oreo cheesecake is best served cool, not ice-cold, so take it out of the fridge about 30 minutes before serving. This lets the filling soften slightly and the flavours open up, so it tastes creamier and less chilled. Slice it with a hot, clean knife, as described above, and serve each slice on a chilled plate if you have one, which keeps it cool while people eat.
For a simple dessert, serve a slice on its own, with nothing else. It does not need accompaniment, and adding too much to the plate can distract from the cheesecake itself. A cup of coffee or a glass of cold milk is the perfect partner, because both cut through the richness without competing with it. For a party, serve the whole cheesecake on a cake stand in the middle of the table, with a cake server nearby, and let people help themselves. It looks generous and inviting, and it saves you from plating individual slices while everyone is waiting.
For a more elaborate dessert plate, serve a slice with a drizzle of chocolate sauce, a few fresh berries, and a small scoop of vanilla ice cream. The berries add freshness and colour, and the ice cream makes it feel like a restaurant dessert. This is a good option for a special occasion, when you want dessert to feel like an event rather than just a sweet ending to a meal. For more ideas, browse our Desserts & Baking collection, try our small batch cookies for a smaller treat, or plan a full menu starting with an easy rotisserie chicken dinner and simple chicken dinner ideas before this cheesecake. To read more about the classics behind it, see cheesecake and Oreo.
If you are serving children, consider making a few individual glasses alongside the main cheesecake, so they can have their own portion with extra crushed cookies on top. Children love having their own dessert glass, and it saves you from negotiating slice sizes at the table. Adults, in my experience, are just as happy with a generous slice and a quiet moment to enjoy it.
Storage and Make-Ahead
No-bake Oreo cheesecake keeps in the fridge, covered, for up to 5 days, and it actually tastes best on the second day, after the flavours have had time to meld. Keep it in the springform pan or on a covered plate, and do not leave it at room temperature for more than 2 hours, because of the cream cheese and cream in the filling. If you need to transport it, keep it cold in a cooler bag and assemble the topping at your destination if possible, so the cream does not wilt in transit.
You can freeze this cheesecake for up to 3 months, which makes it a wonderful dessert to have ready for unexpected guests. Freeze it without the whipped cream topping, wrapped tightly in cling film and then foil, and thaw it in the fridge overnight before adding the topping and serving. The texture will be very slightly softer after freezing, but the flavour will be unchanged, and it will still slice cleanly if you let it thaw fully in the fridge.
Leftover slices should go straight back into the fridge in an airtight container. Eat them within a few days, and do not be surprised if they disappear faster than you expected. A slice of cold Oreo cheesecake eaten late at night, standing in front of the open fridge, is a universal experience, and I would not dream of judging it.
Frequently Asked Questions
Why is my no-bake cheesecake not setting?
The most common reasons are low-fat cream cheese, under-whipped cream, or not enough chilling time. Use full-fat cream cheese, whip the cream to proper soft peaks, and chill the cheesecake for at least 6 hours, preferably overnight. If your kitchen is very warm, the cheesecake may also need longer in the fridge, so give it the full overnight chill before you worry. A cheesecake that is still soft after overnight chilling may need a little gelatin, but with full-fat ingredients and proper chilling, it should set on its own.
Can I make this cheesecake without a springform pan?
Yes. Line a regular 9-inch cake tin with cling film, leaving plenty overhanging on all sides, and use it in place of the springform pan. Once the cheesecake is set, lift it out by the film and peel the film away carefully. The sides will not be quite as smooth as with a springform pan, but the cheesecake will taste exactly the same. You can also make it in a deep pie dish and serve it straight from the dish with a spoon, like a trifle, which is perfectly acceptable for a family dessert.
Can I use low-fat cream cheese?
You can, but the cheesecake will be softer and less rich, and it may not slice as cleanly. If you do use low-fat cream cheese, chill the cheesecake for a full 24 hours and serve it in a dish rather than trying to slice it neatly. For the best texture and flavour, full-fat cream cheese is strongly recommended, and it is worth buying specifically for this recipe.
How do I get clean slices?
Use a long, sharp knife, run it under hot water, wipe it dry, and cut with a firm, straight motion, wiping the knife clean between each slice. Do not saw back and forth, or the filling will drag and the crust will crumble. A hot knife melts through the filling cleanly, and wiping it between slices stops cookie crumbs from building up on the blade and spoiling the next slice.
Can I make this cheesecake ahead for a party?
Yes, this cheesecake is ideal for making ahead. Make it up to 2 days before the party and keep it covered in the fridge, adding the whipped cream topping and cookie decoration on the day you serve it. This keeps the topping fresh and the cookies crisp, and it means dessert is completely done before your guests arrive, which is one less thing to worry about on the day.
Will the cookies in the filling go soggy?
The cookies in the filling will soften as the cheesecake chills, which is exactly what you want. They become soft and cake-like, rather than crunchy, and they blend into the creamy filling while still keeping their flavour and dark colour. If you want some crunch, save a handful of crushed cookies for the topping, where they will stay crisp until serving. The contrast between the soft filling and the crunchy topping is part of what makes this cheesecake so good.